
Bluebeam open file on download - necessary words
Working With Files in a Studio Project
Studio Projects may contain any type of file, not just PDFs. PDF files will open in Revu while other file types will open in the default program associated with it on your device.
Only Hosts and those with appropriate permissions can upload documents to a Project.
Note: In order to upload or download a file in Studio, the system clock of the local machine must be set up correctly so that it is in sync (within 15 minutes) with UTC, otherwise any attempt to upload or download a file in Studio will result in an error. Update the system clock of the local machine so that it is correct for the time zone specified in its Date and Time settings and try the upload or download again.
Users can create new folders in the Project, select individual files to upload, or upload an entire folder and its contents.
Users can only add files to a Project that they have started or for which have been granted the appropriate permissions.
To add files to a Project, go to the Project tab, click Add and select one of the following options:
- New Folder: Creates a new folder in the root directory of the Project. Once selected, the New Folder dialog box appears. Enter a name for the folder and click OK to create it.
- Upload Files: Uploads individually selected files to the root directory of the Project. Once selected, the Upload Files dialog box appears. Click Add and select to upload either Files (by navigating to the desired files), Open Files (which automatically adds all PDFs currently open) or Open Set (which automatically opens the Set currently open).
- Upload Folder: Uploads the contents of a folder to the root directory of the Project. Once selected, the dialog box appears. Navigate to and select the desired folder and click.
- This option recreates the selected folder in the Project and uploads the contents into that folder automatically.
PDF files in a Project can be added to a Studio Session. This makes it possible to work on Project files using the real time collaboration advantages of a Session. An icon will appear next to the name of any Project file that has been added to a Session.
Only Sessions that are created using this feature can have Project files added to them. Therefore, unless you are adding more PDFs to a Session that has already been created for this purpose, the first step is to add a file to a new Session, as described below. Once the Session has been created, additional Project files can be added.
Users must have both the Send PDFs to Sessions permission and at least Read/Writefolder permission to use this feature (note that users with The Full Controlpermission have both of these permissions by default).
The user who sends the first Project file to the Session is automatically the Session Host and can send additional Project files to the Session as desired; any other user in the Project who wishes to send additional Project files to the Session not only needs to meet the Project permissions requirements described above, but also must be added to the Session and have the Add Documents permission in it.
To add files to a new Session:
- the PDF file and select Add to New Session. The New Session dialog box appears.
- CTRL-click or SHIFT-click to select multiple PDFs.
Enter a name for the new Session in the Name field and click OK. The Session is automatically created with the selected PDF. You are automatically the Host of this Session and can manage it normally.
To add files to an existing Session:
- the PDF file and select Add to <existing session name>. Note that only Sessions created using the Add to New Session process as described above will appear.
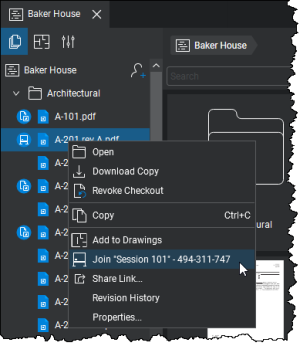
PDFs that have been added to a Session are tagged with a ![]() icon on the Project panel. Users can join this Session directly by right-clicking the file in the Project tab and selecting Join <existing session name>.
icon on the Project panel. Users can join this Session directly by right-clicking the file in the Project tab and selecting Join <existing session name>.
After the Session work done to a Project file is complete, you might wish to transfer the updated version of the document from the Session and back into the Project.
Note: In order for this process to succeed, the Project file must be checked out to the Session. If the check out to the Session is ever revoked, you will not be able to use this process to update the Project file. Instead, download a copy of the Session file and use it to replace the Project file.
To update a Project file with the Session copy:
If you know which Session the PDF is in, open it. If you're not sure which Session it's in, right-click the Project name on the Project tab and select Show Sessions.
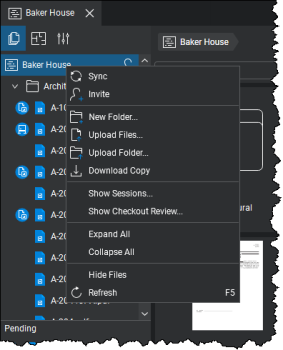
The Available Sessions dialog box appears showing all Sessions attached to the Project. Select the appropriate Session and click Join.
the desired document in the Session and select
 Update Project Copy.
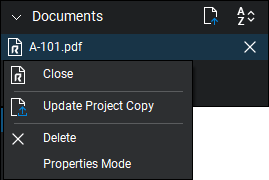
The Check In dialog box appears. Enter any comments that should accompany this check in (optional) and click Check In. A message will appear informing you that the update request has been received.
Note: If a different message appears informing you that the Project copy could not be updated because it is no longer checked out to the Session, then this process will not succeed. In order to update the Project file, you will need to download a copy of the Session file and use it to replace the Project file.
- Click OK. The Session file will be automatically checked into the Project as a new Revision.
- In the event that the update process fails, an email is automatically sent to you. If the Project file is still checked out to the Session, you can attempt this process again. If not, you will need to download a copy of the Session file and use it to replace the Project file.
To download a copy of a Project file or folder (including the root Project folder) to a local or network drive, go to the Project tab, right-click it on and select  Download Copy.
When downloading a Project folder, all of its files and subfolders are automatically included. Note that the root Project folder is only shown in left panel of the Project tab, so to download copies of all the files in the Project, right-click the root Project folder there.
It is sometimes necessary to replace Project files with updated copies from a local or network drive. To do so:
- Check out the desired Project file. You can only replace a file if it is currently checked out to you. It is not necessary to open the file, however.
- the Project file and select Replace File. An Open dialog box appears.
- A warning might appear first alerting you that the procedure will replace the Project file. If it does, click.
- Select the desired replacement file and click Open.
- the Project file and select either Check In (if you are done working on the file) or Update Server Copy (if you are not).
Users can share Project files with people outside the Project, providing them a link through which they can download a local copy of the file. The recipient will not have access to other Project files or features, but they will be able to use the same link to download updated versions of the file for as long as the link is active.
Only Project users with the Share Items or Full Controlpermission can share items.
To share a link to a Project file:
From the Project tab, the desired file and select
 Share Link. The Share File dialog box appears.
- Select the active period for the link to the file from the Share File for menu:
- Lifetime of Project: Select this option to have the link remain active for as long as the Project is active. The recipient will be able to use the link to download a current version of the file for the duration of the Project.
- 24 Hours: Select this option to have the link automatically expire 24 hours after it is created.
- To require a password in order to download the Project file, select and enter a password in the Password and Confirm Password fields. The recipient will be required to enter the same password before being allowed to download the file.
- Passwords must be at least five characters long.
- To flatten all markups in the shared version of the document, select Flatten. This does not flatten the markups in the Project file, only the copy being shared outside the Project.
Click OK. A second Share File dialog box appears.
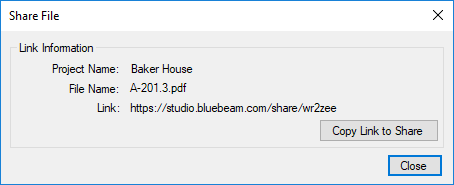
- Click Copy Link to Share to copy the link to the clipboard. Once it is copied to the clipboard, you can paste it into an email or other type of electronic message to send to recipients. If you set the file to require a password, be sure to let them know what the password is as well.
When your recipient receives the link, they will need to open it in the browser of their choice, which will provide them with a download button that they can use to retrieve the file. If a password is required, they will be prompted for it first.
You can force external links to Project files to expire ahead of their scheduled expiration, if desired. Users with sufficient permissions (Project owners or users with Full Control) can force the expiration of any link in the Project; all others can only force the expiration of links they generated.
To force a Project link to expire:
- On the Project tab, click
 Settings. The Project Settings dialog box appears.
 - Click Manage Shared Links. A opens in Revu to a Studio Shared Links page.
- The Studio Shared Links page shows all your Studio Projects. Locate the desired Project (using the My Projects and Attended Projects links can be helpful to this task) and click its link. All the available links are shown.
- To force a link to expire, click Expire.
Project owners who want to see what Project files have been shared with people outside the Project can view all links, both Active and Expired, on the Manage Shared Links page.
To audit shared links:
- On the Project tab, click Settings. The Project Settings dialog box appears.
- Click Manage Shared Links. A opens in Revu to a Studio Shared Links page.
- The Studio Shared Links page shows all your Studio Projects. Locate the desired Project (using the My Projects and Attended Projects links can be helpful to this task) and click its link. All the available links are shown.
- Click Active to view links that are currently active.
- Click Expired to view links that have expired.
There are a few icons that can appear next to Studio files to show the status of the file. These icons can appear on the document tab or in the Project Documents tab.
Document Tabs
![]()
 Indicates that the PDF is a Project file that you have checked out.
 Indicates that the PDF is a Project file that you have opened, but not checked out. This file is read-only. To check out the file so you can edit it, and select Check Out.
 Indicates that the PDF is a Session file.
Project Tab
Since Session documents are not checked in and out, they do not have different statuses like Project files, so the only place you will see status icons is on files and folders on a Project tab.
![]() Opened: Indicates a Project file that you have opened, but not checked out. This file is read-only. To check out the file so you can edit it, and select Check Out.
Opened: Indicates a Project file that you have opened, but not checked out. This file is read-only. To check out the file so you can edit it, and select Check Out.
![]() Checked Out: Indicates a Project file that you have checked out.
Checked Out: Indicates a Project file that you have checked out.
![]() Checked Out to Another User: Indicates a Project file checked out to another user. on the file and select Properties to find who has the file checked out.
Checked Out to Another User: Indicates a Project file checked out to another user. on the file and select Properties to find who has the file checked out.
![]() In a Session: Indicates a Project PDF that has been added to a Session.
In a Session: Indicates a Project PDF that has been added to a Session.
![]() Sync Off: Indicates that the Project file or folder is not currently flagged to take part in file synchronizations. This badge only appears when the mouse cursor moves over the file or folder.
Sync Off: Indicates that the Project file or folder is not currently flagged to take part in file synchronizations. This badge only appears when the mouse cursor moves over the file or folder.
![]() Sync On: Indicates that the Project file or folder is currently flagged to take part in file synchronizations.
Sync On: Indicates that the Project file or folder is currently flagged to take part in file synchronizations.
![]() Edit Offline: Indicates that the Project file is one you are currently editing while offline.
Edit Offline: Indicates that the Project file is one you are currently editing while offline.
on a file in the Documents section of the Project tab and you have the following options depending on the file type, the current status of the file, and your permissions:
Add to New Session: Add the PDF file to a new Studio Session. Only valid for PDF files.
Add to session name: Add the PDF file to this existing Studio Session. Only valid for PDF files.
 Check In: Checks in a previously checked out file, including any changes made to it, even if unsaved.
Check Out: Opens the file (if it is not already) and checks it out to you. Only files that have been checked out can be edited and only one user can check out a file at a time.
 Copy: Copies the file so you can paste another copy into another folder in the Project.
 Cut: Cuts the file from its current location so you can move it to another folder in the Project.
 Delete: Removes the file from the project.
Discard Changes: Discards pending changes to the PDF, returning it to previous state.
Download Copy: Downloads a copy of the document to a local or network drive.
Open: Opens the file for viewing. Files that are only opened (but not checked out) cannot be edited.
Open Project Copy: Opens the server copy of the Project file in a new tab.
 Paste: Pastes a cut or copied file into the selected folder.
Properties: Shows the properties of the file, including its name, project path, status, creation date, and size.
Rename: Changes the name of the file.
Replace File: Allows you to replace the server copy of a Project file with one from a local or network drive.
Revert Changes: Reverses any changes you have made to the Project file that you have not checked in, essentially opening the server copy again.
Revision History: Shows the revision history of the file and allows you to open a previous version of the file.
Share Link: Allows you to provide a link to the Project file that can be used by somebody outside the Project to open and view the file.
 Undo Checkout: Releases your Check Out (making it available for another user to check out) and discards any changes you made to the file.
Update Server Copy: Updates the Project file with changes you have made but does not check it in.
Help Guide
Revu 20
Studio


-